
Guide Guía
First steps
Primeros pasos
Create the clinic, invite the team and run the first visit without getting lost.
Crea la clínica, invita al equipo y atiende la primera visita sin perderte.
Open this screen → Abrir esta pantalla →1. Set up the clinic 1. Configura la clínica
After you confirm your email, SmilePro asks for the establishment: name, logo, timezone, currency and branches. Those details appear on calendars, PDFs, emails and WhatsApp messages, so complete them before the first patient arrives.
Después de confirmar el correo, SmilePro pide el establecimiento: nombre, logo, zona horaria, moneda y sucursales. Esos datos aparecen en calendarios, PDFs, correos y mensajes de WhatsApp, así que complétalos antes de que llegue el primer paciente.
- Administrators own Settings and Catalogs; doctors and assistants work the clinic.
- Los administradores configuran; los doctores y asistentes atienden.
- The complimentary owner-doctor user lets the first professional start immediately.
- El usuario de propietario-doctor de cortesía permite que el primer profesional empiece de inmediato.
2. Invite the team 2. Invita al equipo
Doctors are invited from Settings → Professionals: create the professional, set what they can open under System access, and the invitation goes out when you save. Administrators and assistants are invited from Settings → Staff. Either way, they must use that invitation to join this clinic; signing up on their own creates a different establishment.
Los doctores se invitan desde Configuración → Profesionales: crea al profesional, marca lo que puede abrir en Acceso al sistema y la invitación sale al guardar. Administradores y asistentes se invitan desde Configuración → Personal. En ambos casos deben usar esa invitación para entrar a esta clínica; registrarse por su cuenta crea otro establecimiento.
- Doctor: Settings → Professionals → New professional, with System access on.
- Doctor: Configuración → Profesionales → Nuevo profesional, con Acceso al sistema activo.
- Administrator or assistant: Settings → Staff → invite by name and email.
- Administrador o asistente: Configuración → Personal → invita por nombre y correo.
- Grant only the sidebar groups that person needs.
- Concede solo los grupos del menú que esa persona necesita.
- The invitee opens the email, accepts and lands on the first screen their permissions open.
- La persona abre el correo, acepta y entra a la primera pantalla que sus permisos le abren.
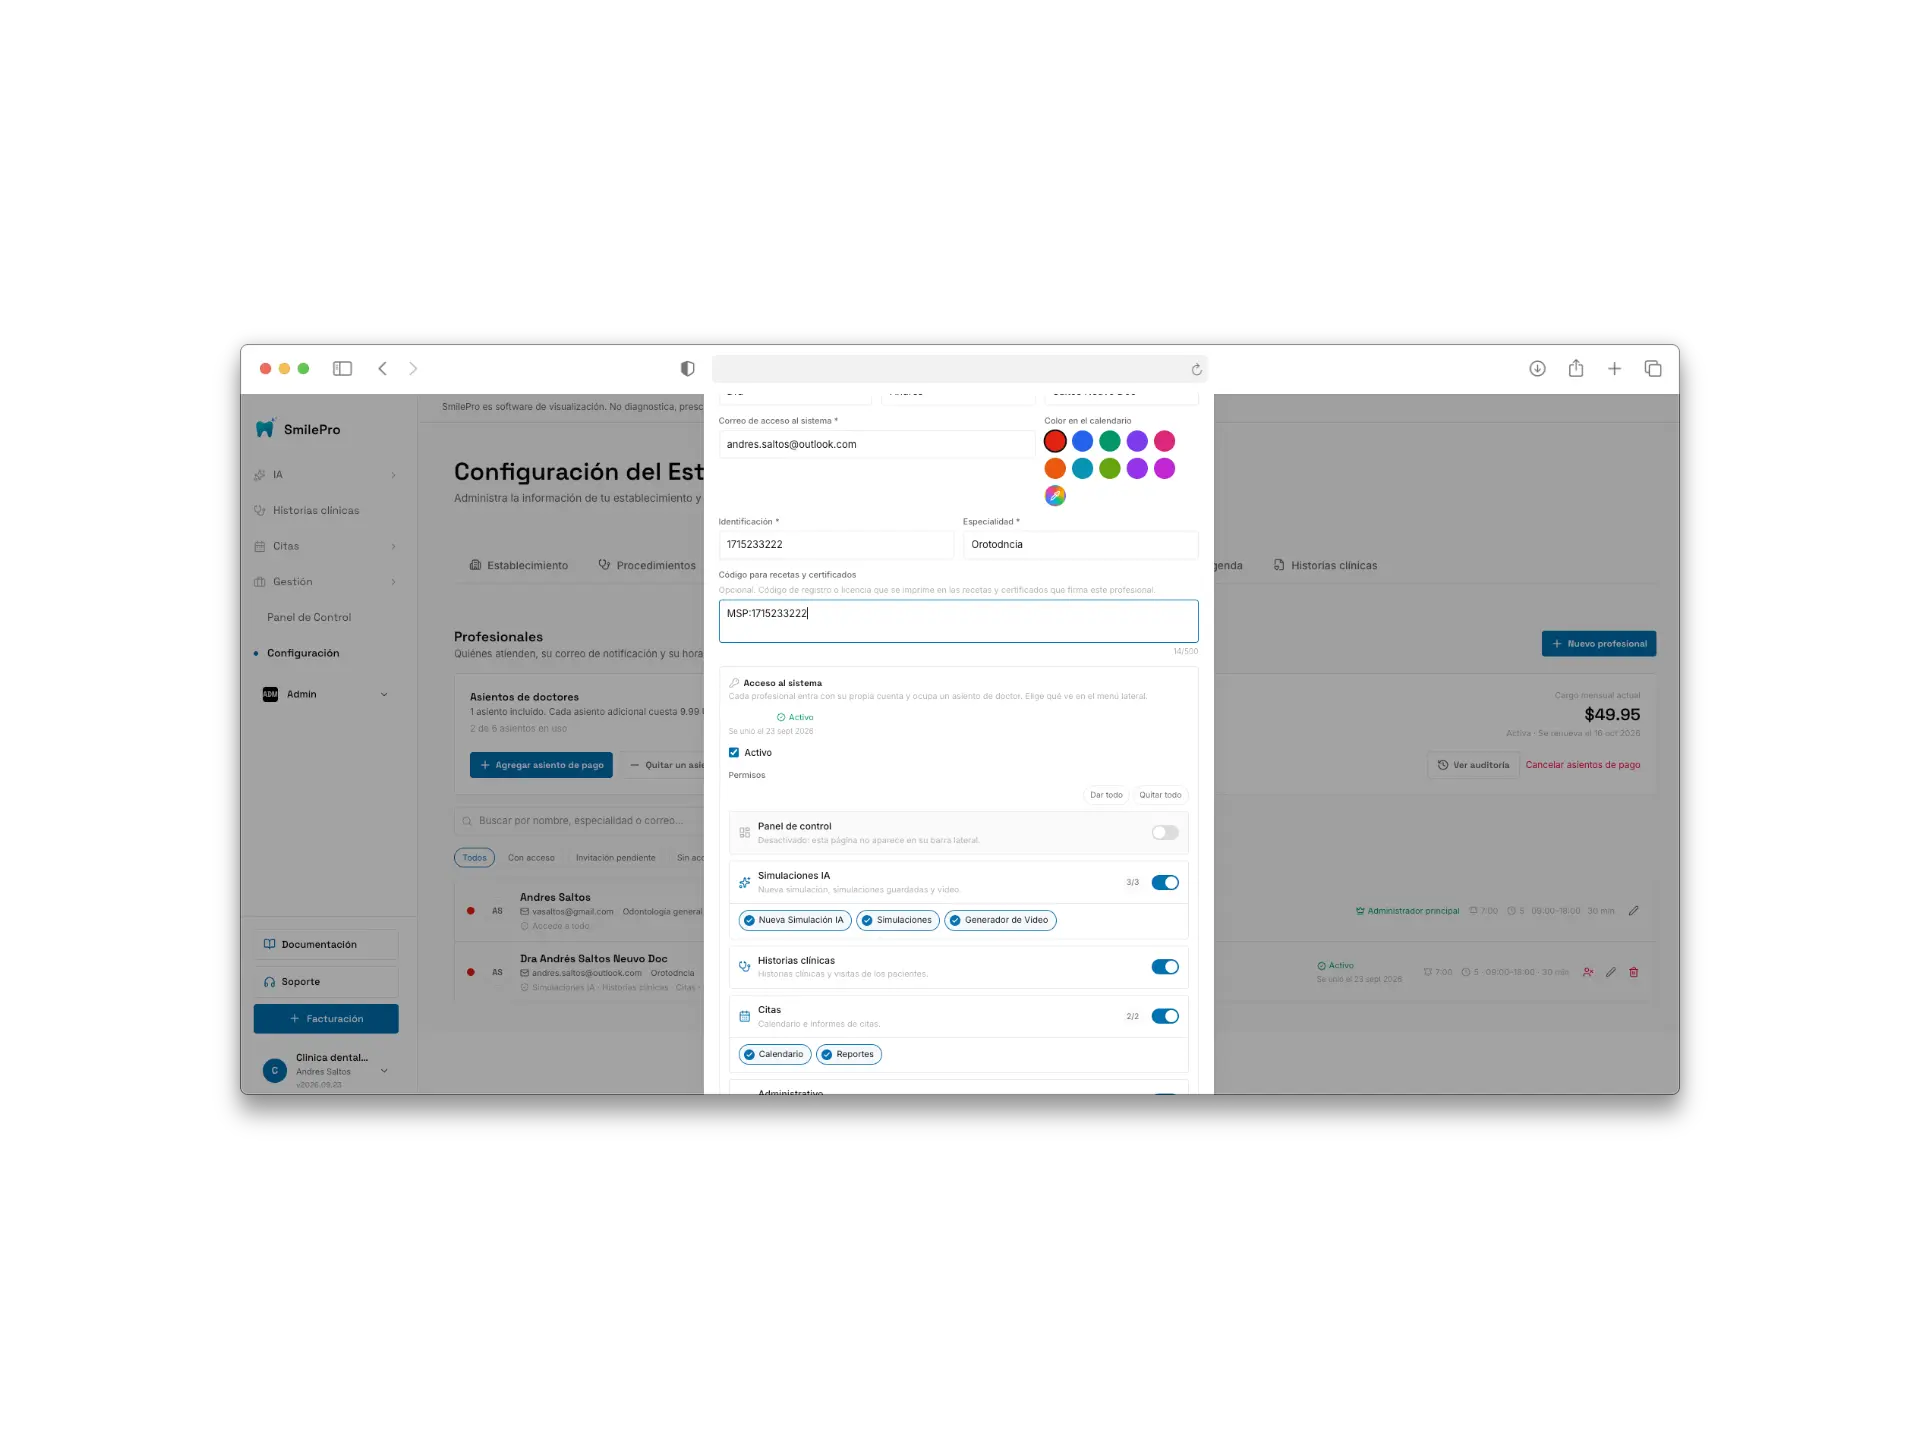
Settings → Professionals, new professional form with the System access section open.
Configuración → Profesionales, formulario de nuevo profesional con la sección Acceso al sistema abierta.
https://cdn.smilepro.app/docs/first-steps-invite-professional.webp A user can have a whole area switched off, or a single item inside one. The menu hides what it cannot reach.
Un usuario puede tener un área completa apagada, o un solo ítem dentro de ella. El menú oculta lo que no puede abrir.
3. A typical first day 3. Un primer día típico
The shortest useful loop is: register the patient, book the visit, generate a smile simulation, chart the odontogram and hand over a budget. Everything else hangs from that loop.
El circuito más corto y útil es: registrar al paciente, agendar la visita, generar una simulación de sonrisa, registrar el odontograma y entregar un presupuesto. Todo lo demás cuelga de ese circuito.
- Patients → create the file (contact, insurance, emergency).
- Pacientes → crea la ficha (contacto, seguro, emergencia).
- Calendar → book the visit on a professional’s agenda.
- Calendario → agenda la visita en la agenda de un profesional.
- From the appointment, open the clinical history and record antecedents.
- Desde la cita, abre la historia clínica y registra antecedentes.
- New AI Simulation → frontal photo → assign the result to the patient.
- Nueva simulación IA → foto frontal → asigna el resultado al paciente.
- From the visit, chart the odontogram and generate a budget.
- Desde la visita, registra el odontograma y genera un presupuesto.
Use the Documentation button in the sidebar whenever you need the long version of a screen. Support is the button next to it.
Usa el botón Documentación del menú lateral cuando necesites la versión larga de una pantalla. Soporte es el botón de al lado.
Getting around the menu Moverse por el menú
The sidebar follows the clinic’s order: AI, Clinical histories, Appointments and Management. Only one group is open at a time — opening another closes the previous one — and the group holding the page you are on opens by itself.
El menú lateral sigue el orden de la clínica: IA, Historias clínicas, Citas y Gestión. Solo un grupo está abierto a la vez —abrir otro cierra el anterior— y el grupo de la página en la que estás se abre solo.
- Clinical histories is its own entry, right below AI, not a submenu of Appointments.
- Historias clínicas es una entrada propia, justo debajo de IA, no un submenú de Citas.
- Documentation, Support, Billing and your account stay pinned at the bottom, even on a phone.
- Documentación, Soporte, Facturación y tu cuenta quedan fijos abajo, también en el móvil.
- Billing only appears for administrators.
- Facturación solo aparece para los administradores.
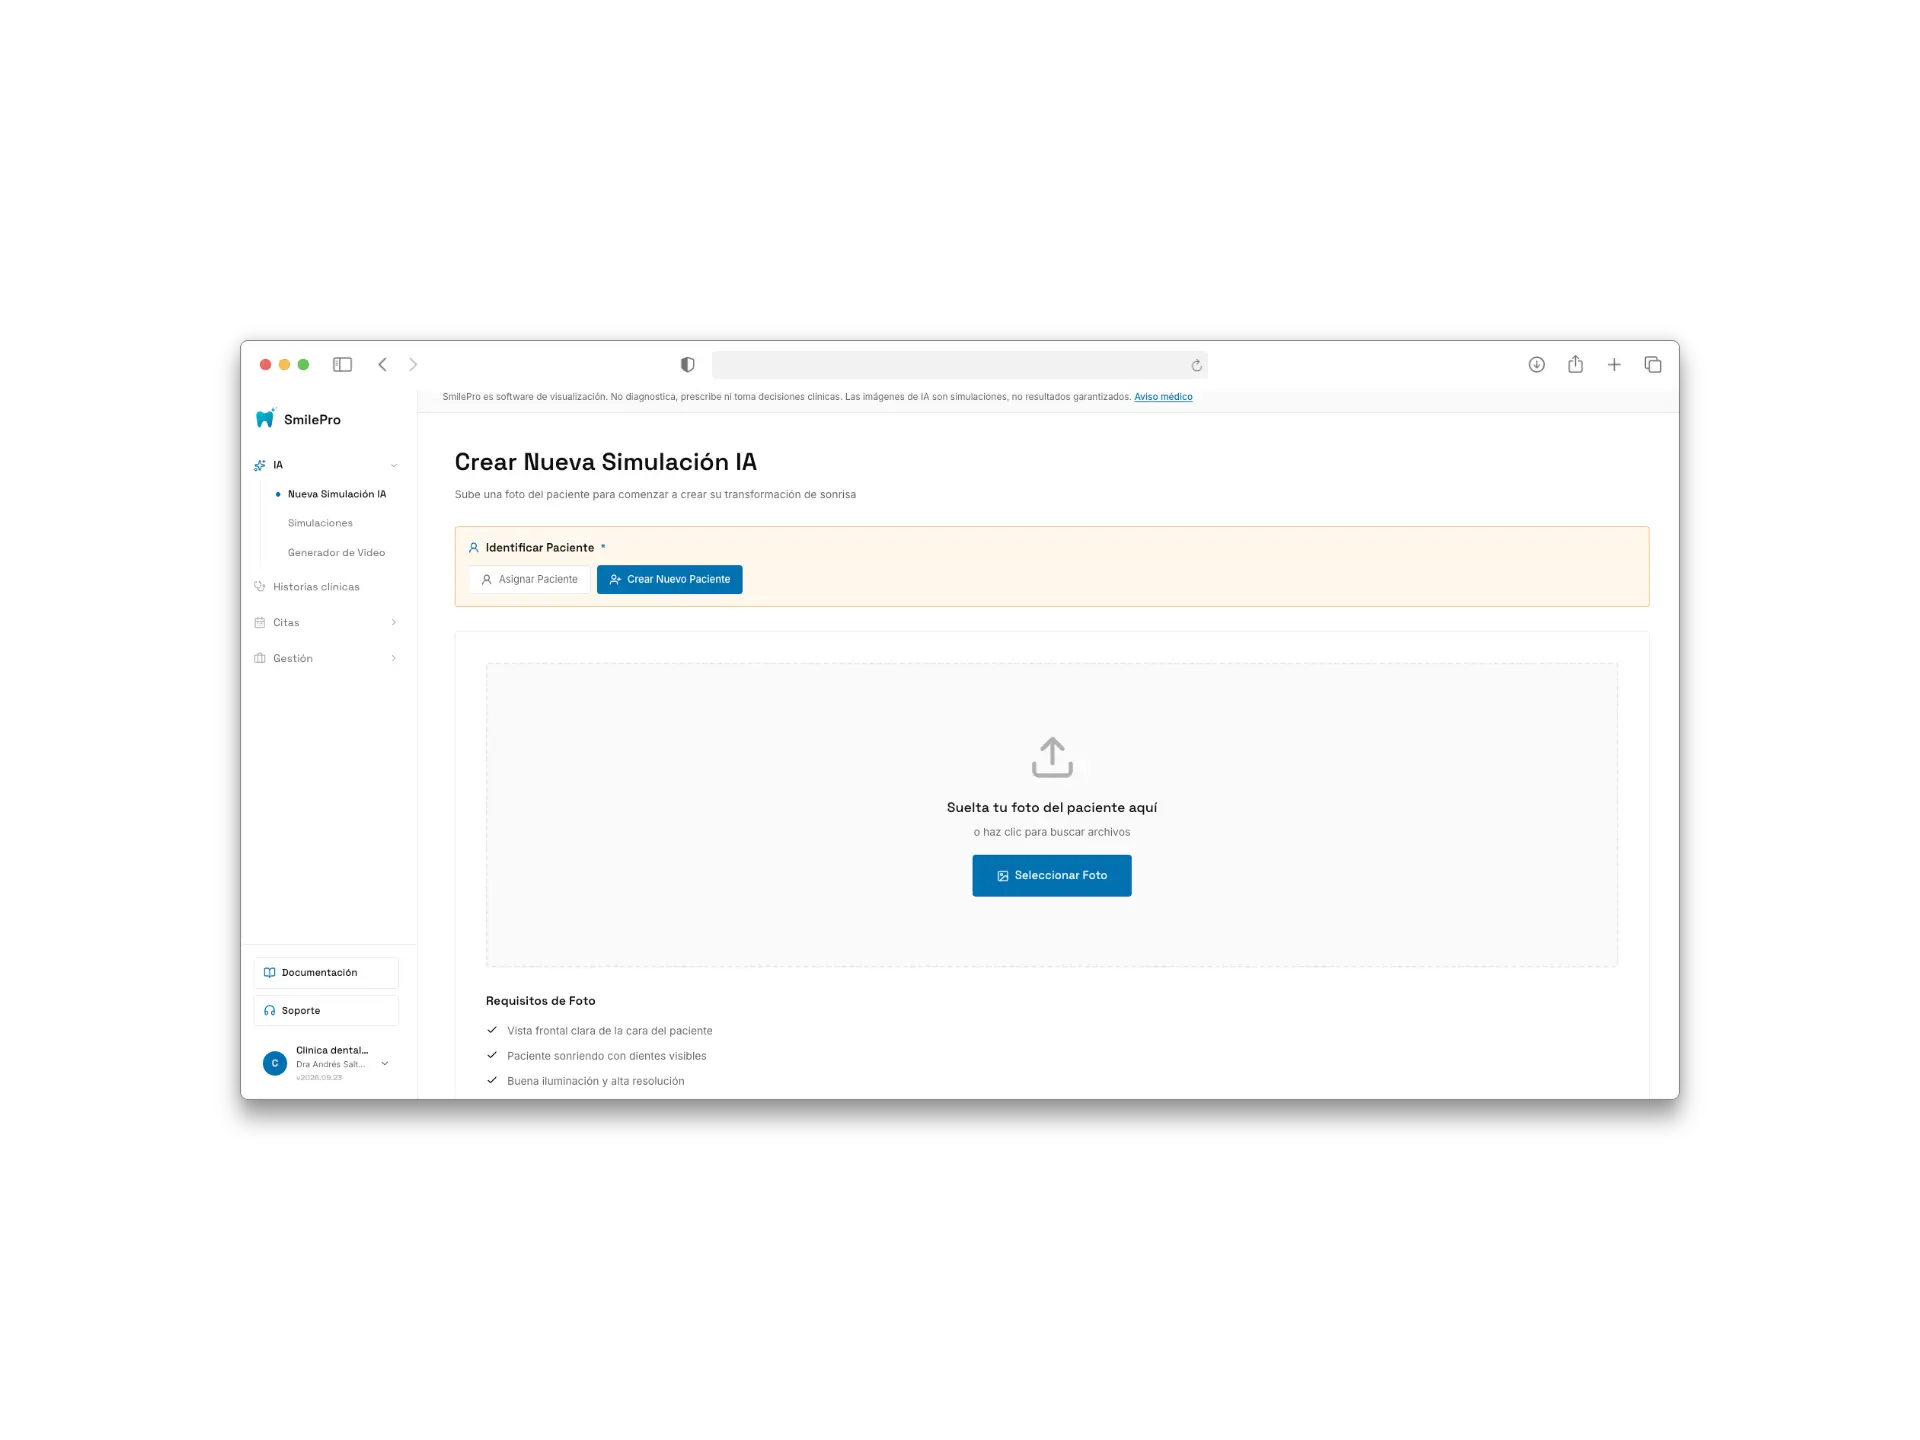
The sidebar with the AI group open, Clinical histories below it and the pinned footer.
El menú lateral con el grupo IA abierto, Historias clínicas debajo y el pie fijo.
https://cdn.smilepro.app/docs/first-steps-sidebar-2.webp